
Welcome to this post about How to Set Up Gmail for Productivity!
I’ve been using Gmail for quite some time now. It’s hands down the best email provider I’ve found.
My favorite part has to be how customizable it is. The number of settings, shortcuts, folders, etc. that you can set up or change is very impressive.
Over the last few months I’ve started to develop a Gmail system that works really well for me. It keeps my distractions limited, my emails organized, and most importantly, my time spent in Gmail to a minimum.
That’s what I hope to share today. I want to cover the tools, settings, filters, labels, shortcuts, and workflow I use to be productive on Gmail.
Let’s get into it!
Tools and Techniques
Inbox Zero
I’ve talked a lot about inbox zero in How To Organize Email in 2021, so I won’t go too in-depth here. Essentially inbox zero is about keeping your inbox empty for three main benefits:
- Focus on what is in front of you
- Know everything that you need is organized
- You don’t miss anything that gets buried in your inbox
I think why a lot of people have issues managing email is because of the sheer number of emails they get each day. I remember I used to get 30-40 emails a day which isn’t even that much compared to other people.
Thankfully, I now only get 10-20 emails a day because I’ve unsubscribed from dozens of email lists. It’s a lot easier to stay on top of your inbox when you only have important emails coming in. So I’d recommend trying to remove some of clutter by unsubscribing from as many email lists as you can.
You can do this manually by going through each email that you get and unsubscribing from the ones you don’t want at the bottom of the email. But, why do this manually when you can do it automatically?
Unroll.Me
I discovered this AMAZING tool about a month or so ago called Unroll.Me. Unroll.Me allows you to manage your email subscriptions in a very easy and convenient manner. The best part about Unroll.Me is that it is 100% FREE.
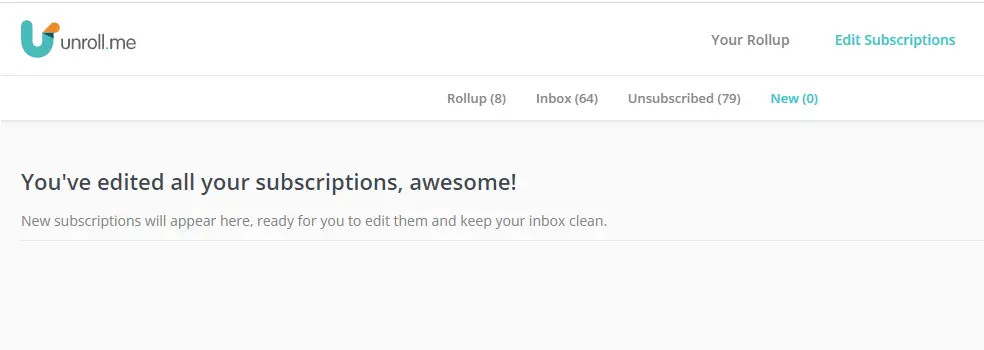
Once you sign up you’ll get access to a giant list of all of your current email subscriptions. You can choose to either keep, unsubscribe, or “rollup” each of the email lists you are subscribed to in a click of a button. If you choose to keep an email subscription, you’ll keep getting emails like normal.
If you unsubscribe, you’ll immediately stop receiving emails from that address without needing to take any other steps. I don’t know about you but I find it extremely frustrating when I am attempting to unsubscribe from a list and I can’t seem to do so for whatever reason. Once you unsubscribe with Unroll.Me, you won’t get another email from that address again, period.
If you rollup an email subscription, it will get added to your Daily Rollup email list. Essentially, each evening Unroll.Me sends out one email with all of your rollups in it. It’s a great way to consolidate a bunch of email subscriptions into one daily email.
I can’t recommend Unroll.Me enough. Seriously…this tool shouldn’t be free. If you’re interested in trying it out, follow these steps:
- Type Unroll.Me into your address bar.
- Sign up through your Gmail login.
- You’ll be taken to a list of all of your email subscriptions.
- Choose whether to keep, unsubscribe, or rollup each of your subscriptions.
- Done! It’s that easy.
Notifications
Even though you only should have important emails in your inbox now, I recommend you turn off your email notifications on both your phone and desktop.
This is because one of my main sources of distraction used to come from email notifications. It’s so easy to be working on something and get an important email and then become sidetracked.
While your emails might be important, are they urgent? Most people expect replies within a few hours or days, not within minutes.
So what I recommend is for you to start by turning off all email notifications. Then check your email three times a day. This is just enough to where you can respond to urgent emails without being distracted by your email all day long.
Settings
I have messed with a handful of settings inside of Gmail to optimize my experience. I’m going to do my best to remember which ones I have changed from the defaults and share why.
General
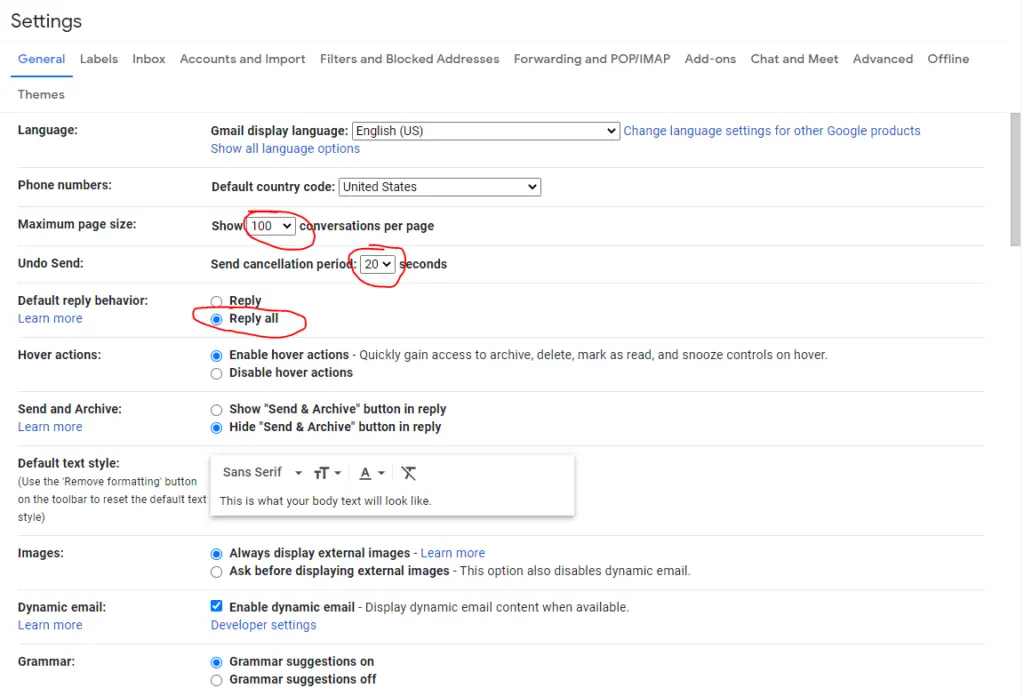
The first thing I changed here was the number of conversations shown per page. The default is 50, but I changed it to 100 just so I could spend less time cycling between pages and pages of emails.
The next thing that I did was change the cancellation period to 20 seconds. Way too often I accidently send an email before it’s ready. When that happens it’s nice to have a few more seconds before it is too late.
I changed the default reply behavior to reply all because I’ve had way too many instances of trying to email the whole group and only emailing one person.
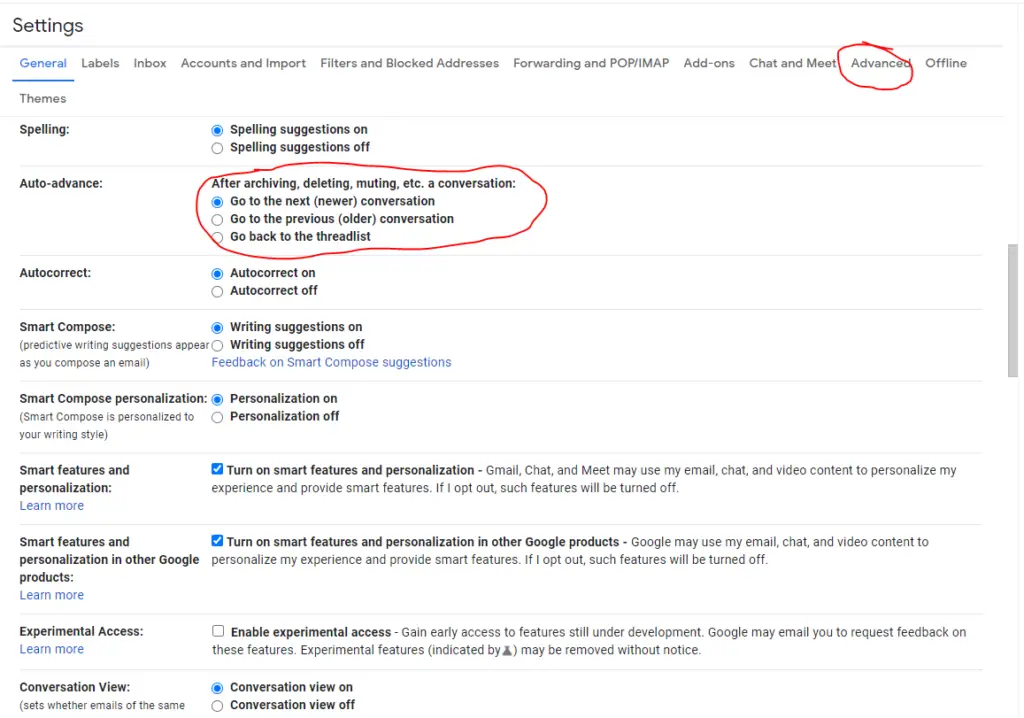
This won’t make sense until I explain the workflow later on, but I recommend you turn on auto-advance. To do this, go to the advanced tab at the top and turn on auto-advance.
Then go back to the general tab and change the auto-advance to “go to the next (newer) conversation”.
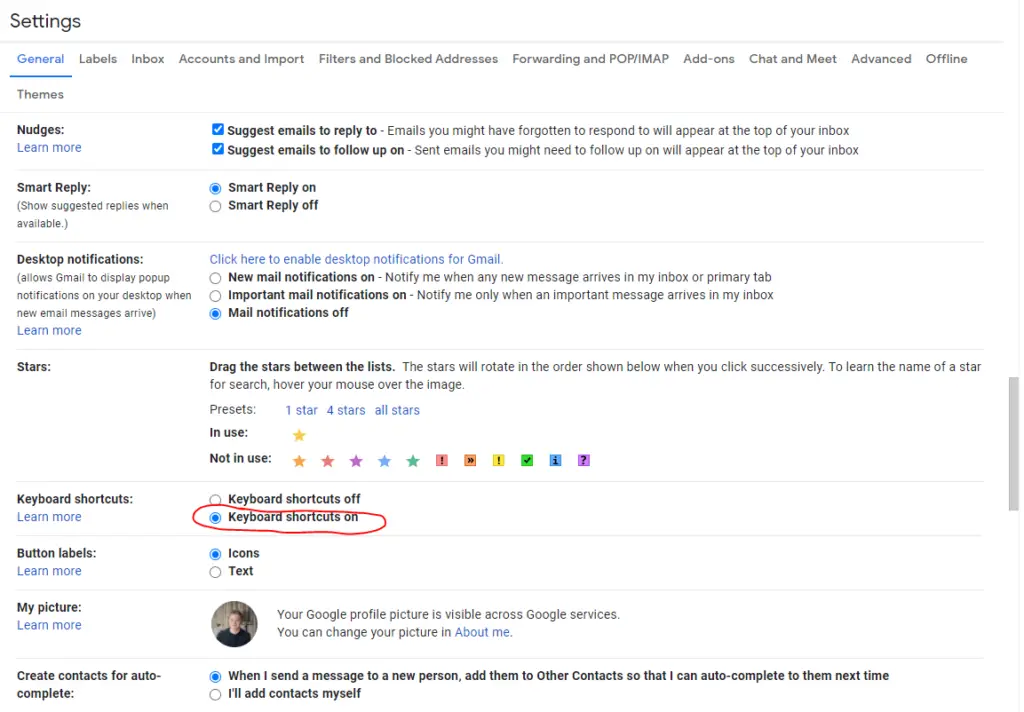
Last but not least for the general tab, I recommend you turn on keyboard shortcuts because we’ll be talking about using these later.
Labels
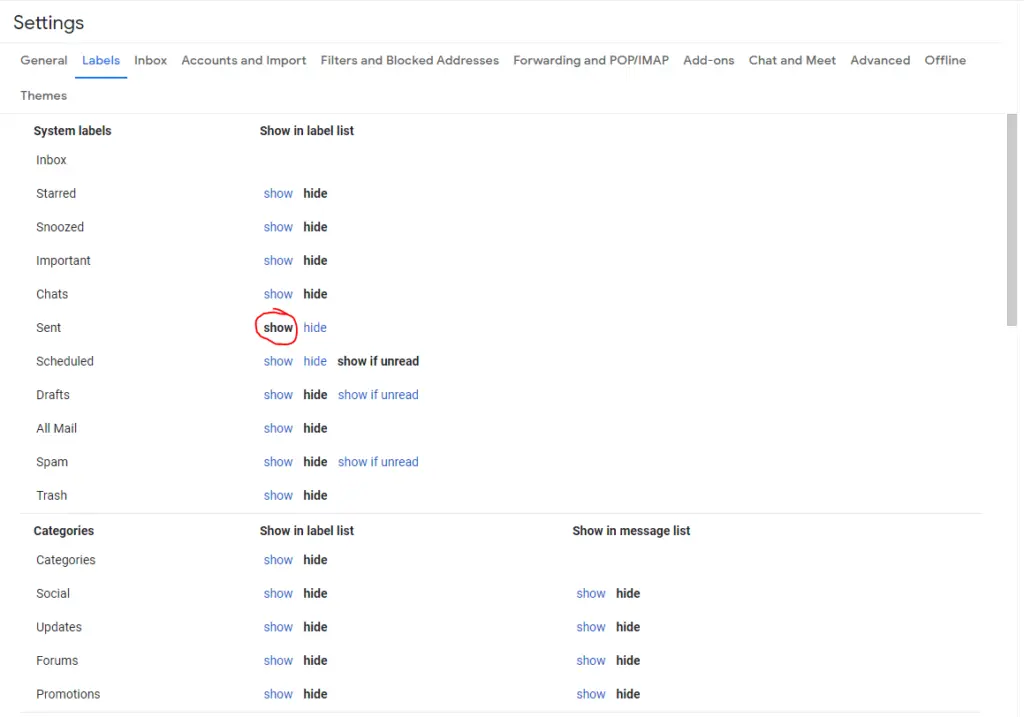
I don’t like my email being overwhelmed with all of the labels and category icons on the left side. So, I hide all of them besides my sent label just because I find myself referencing the emails I send quite often.
Chat and Meet
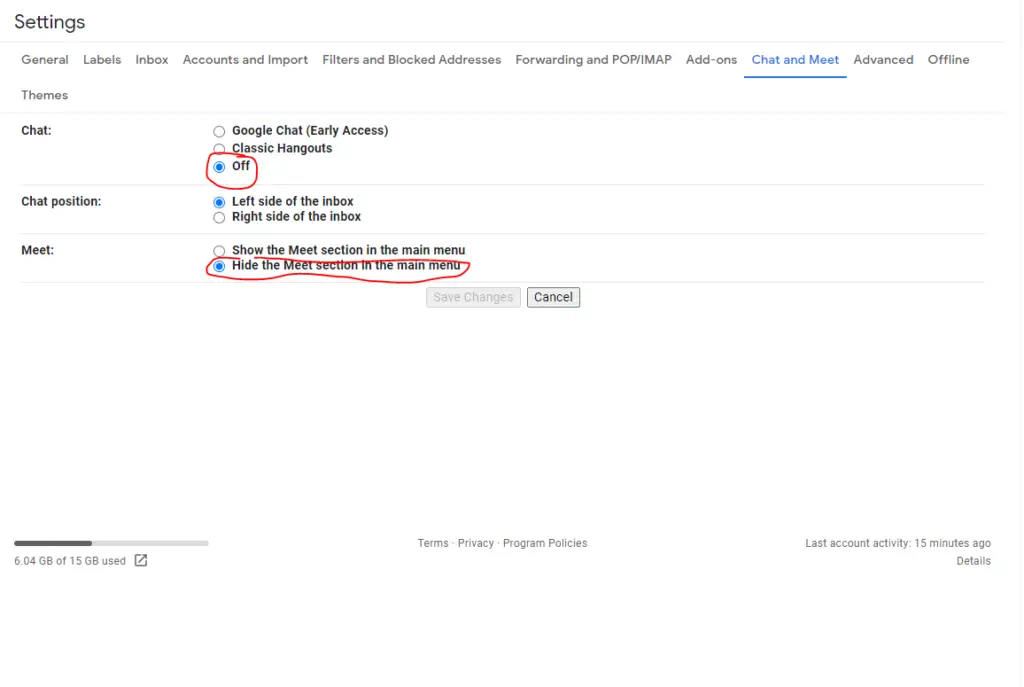
We’re going to skip a few other sections of the settings for now and come back to them later.
Along the same line as the labels, I don’t like how the chat and meet icons are displayed on the sidebar by default so I disabled both.
Filters
One thing that can help a lot when you have a lot of similar emails coming in is setting up filters. While I can’t recommend specific filters for you to set up for your personal situation, I can give you a few ideas:
- Unsubscribe from Certain Types of Emails – Sometimes I don’t want to completely unsubscribe from email addresses, I only want to unsubscribe from certain types of emails they send. For example, I don’t want to unsubscribe from WordPress because that’s where I host my websites. But, I do want to unsubscribe from endless messages letting me know that a plugin was updated.
- Receipts – In order to save all of my self-employment receipts for tax purposes, I created a few filters that move those receipts out of my inbox and into achieved folders where I can reference them later. With this system I never even see the receipts as they pass through my inbox and go straight to their respective folders.
- Most Important Messages – Last but not least, you could set up a filter that starred or somehow marked the most important emails that you receive. You could set this up with your boss, manager, or someone else that you need to report to. That way when you open your inbox you see the most important messages first.
I’m not going to show you how to make filters in this post just because it’s a fairly lengthy process, but here’s a great post that shows you how.
Labels
Remember earlier when we were talking about inbox zero? You might have been wondering what you do with all of your important emails that you need to keep. The answer to that question is you label and achieve them.
There’s noting wrong with having hundreds or thousands of emails saved in labeled folders. The problem is leaving hundreds or thousands of emails in your inbox without them being sorted or dealt with.
Here’s a few different ideas for labels:
- Action Items
- Read Through
- Personal
- School
- Work
- Business
- Finance
These are the seven labels that I have:
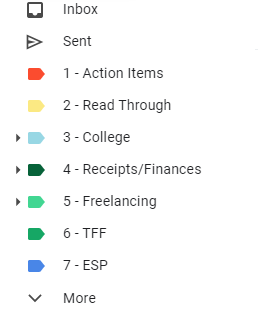
The only two that are required regardless of your situation are the “Action Items” and the “Read Through” labels. This is because you need a folder to store emails that require a further action on your end as well as a folder for emails that you would like to read through.
Check out Jeff Su’s video where he originally showed this idea!
Multiple Inboxes
Once your folders are set up, you might want to set up your inbox to look something like this:
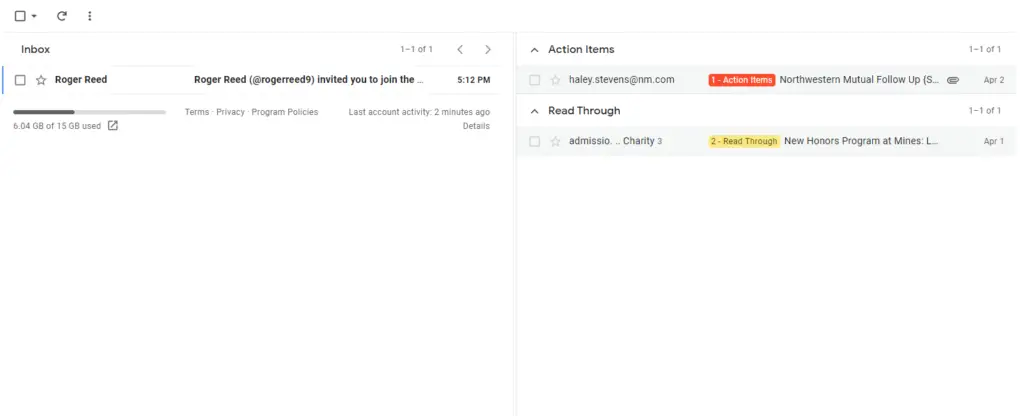
You can see that I have my main inbox on the left and then the action items and read through label folders on the right. This allows you to see emails that are new, require action, or that you want to read all on one screen.
To set this up, go to your inbox settings and change the following:
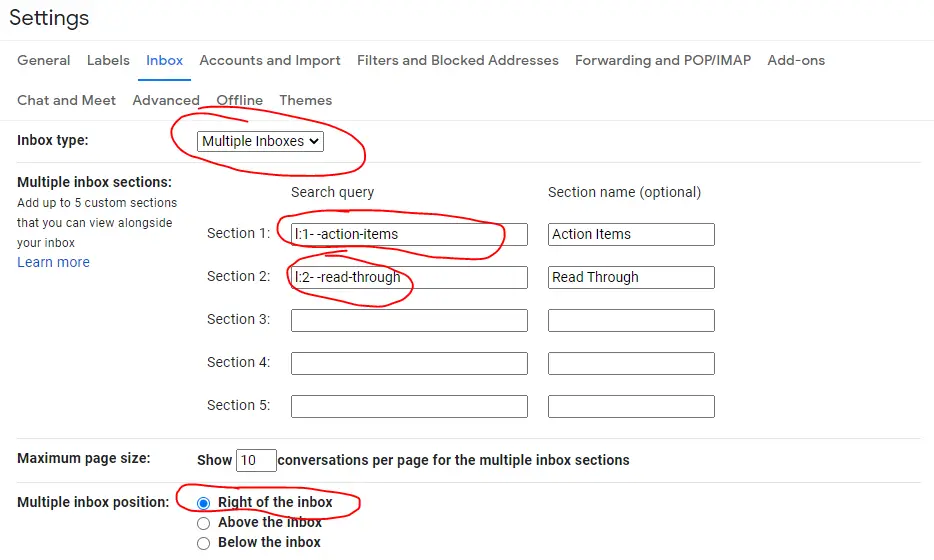
First, change the inbox type to multiple inboxes.
Then, in the search query box, type l:action-items and l:read-through.
You can type whatever you want as the section name.
Change the inbox position to right of the inbox.
Then, hit save and your inbox should look like mine.
Shortcuts
Now that your inbox is officially set up for productivity, you need to learn how to use it. To make the most out of it, here are a few shortcuts I recommend you memorize:
- Move To: v
- Delete: Shift + 3
- Mark Unread: Shift + u
- Reply: r
- Reply All: a
- Forward: f
- Compose: c
- Go to inbox: g + i
- Numbered List: Ctrl + Shift + 7
- Bulleted List: Ctrl + Shift + 8
- Indent: Ctrl + ]
- Send: Ctrl + Enter
Start by just trying to remember v for Move To and Shift + 3 for Delete. These are the main two shortcuts we’ll use in the next section.
Workflow
Now that we have set everything up, how does it all work together?
It starts at one of your scheduled times to process your email. For me, it’s 7:00am, 1:00pm, and 7:00pm. I log in at these times and typically see 5-10 new emails. First, you want to click on the oldest one. It should be at the bottom of your inbox.
For each email, you can only press one of two buttons. Either Shift + 3 to delete the email or v to move the email to a labeled folder. If the email requires no action and doesn’t need to be saved for later, delete it. If the email has an action associated with it, move it to the action items label. When there’s no action required and it doesn’t need to be saved for later, then move it to one of your other labels.
It’s important to note here that you shouldn’t act upon the action items just yet. Simply mark them as action items for now and deal with them later. Otherwise, you’ll get distracted or overwhelmed at what to do next.
As soon as you press one of those buttons, you’ll be taken to the next (newer) email because we set up auto-advance earlier. Follow the same steps here until you work through all of your unread emails.
When you are done, you should have no unread emails, some emails that require action, and maybe a few that you need to read through.
Now you can work through the action items whenever you want. Once the item is taken care of, either delete the email or relabel it into the appreciate folder where it can be saved and used in the future. Once the action items are taken care of, you can also empty the read through folder when you want.
When you’re done your email should be empty and you’re ready for another processing session in a few hours.
The Takeaway
That’s it! That’s how to set up Gmail for productivity! Spend a few MINUTES today getting things set up and learning the processes and within no time you’ll be saving HOURS every day. Please leave any comments, questions, or concerns down in the comments section below! Otherwise, best of luck!